If you ask any Windows 7 user, he will probably tell you that this new OS is miles ahead of Windows Vista. Still it’s not a perfect OS, and there are plenty of tweaks, tips and tricks that can help make your life easier. Below are 36 different tips on how to make the most out of your Windows 7 installation.
1. Using PC Safeguard
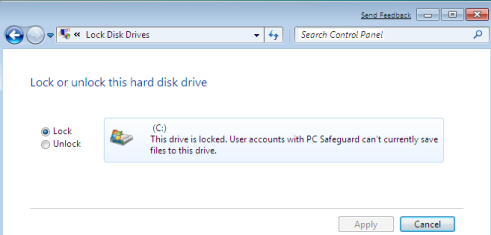
PC Safeguard is a new software that comes with Windows 7, which allows you to revert to preset configurations each time someone else uses your computer. This way your Windows 7 installation will not be compromised by your guests. This way, whoever uses your computer can’t mess it up, by changing settings. This will only apply to other users on your computer, such as Guest. You will have no problems changing settings. Create a new account from User Accounts, in the Control Panel, and activate the PC Safeguard on it.
2. Calibrating your screen
One new feature of Windows 7 is the ability to calibrate your display, by pressing the Window button and typing the letters DCCW. You can select the right brightness for your screen, so you can watch photos or read text without any issues.
3. Restrict what others can do on your PC with AppLocker
If your computer is also used by other people from time to time, you might want to restrict what they can do when they’re not supervized. Using the AppLocker tool you can block them from starting Scripts, Windows installation software, Executables and more.
To get started, press the Win key and type Gpedit.msc. Next, go to Computer Navigation / Windows Settings / Security Settings / Application Control Policies / AppLocker. Now, use the right click to access one of the available options (Script, Installers or Executables) and make a new rule.
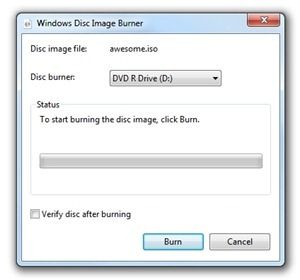 4. Burn Images on DVD’s
You might remember from previous Windows versions, that you didn’t have the option to burn images on CD’s or DVD’s. This changed with Windows 7 and you can easily burn them by double clicking on an ISO file and choosing to burn it on a DVD.
5. Show Removable Drives That Are Empty
Since empty drives aren’t shown by default in Windows 7, visit Tools / Folder Options / View and uncheck the “Hide empty drives in the computer folder” option.
6. Dock windows to the right or left part of the screen
The Windows + Left (or) Right key will dock the currently selected window to the left or right part of the screen. It will also make it occupy exactly half of the screen. It’s a quick way to display two documents on a screen, each occupying half of it.
7. Automatically change wallpapers
Doing this will allow you to change wallpapers on your PC automatically, in a slideshow. Simply right click on your desktop, choose Personalize / Desktop Background, and while you click on images hold CTRL to select more than one. Next, pick at which time interval should they be changed.
8. Make The Taskbar Smaller
If you want a somewhat smaller taskbar, you can partially reduce it in size by decreasing the size of the icons. To make them smaller, right click with your mouse on Start, choose Properties, then Taskbar and select the “Use small icons” setting.
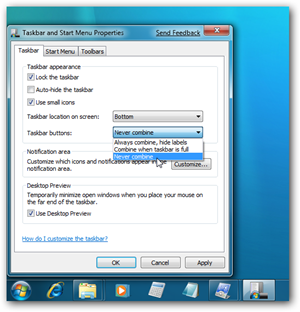 9. Combine Multiple Taskbar Icons
The space on your taskbar tends to get used fairly quickly when you open multiple applications. In order to combine them, right click on Start, select Properties / Taskbar and select the “Combine when taskbar is full” setting.
10. Getting the Quick Launch toolbar back
This is one part of Windows 7 that I didn’t like, the disappearance of the quick launch bar. To get it back, right click on your taskbar, select Toolbar / New Toolbar and type “%UserProfile%\AppData\Roaming\Microsoft\Internet Explorer\Quick Launch” in the folder box. Next, click Select Folder. If you want it to look like in Vista, right click on the taskbar, uncheck the “Lock the taskbar” option, right click on the divider, uncheck the “Show Title” and “Show Text” options. Next, right click again on the taskbar and check the Show small icons option. That’s it.
11. Previewing Photos
If you’re using Windows Explorer and you want to open the preview area, simply press Alt+P and it should appear on the right side.
12. Desktop Magnifier
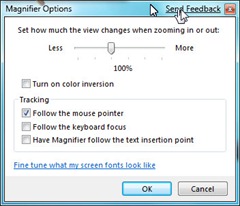 Activating the Desktop Magnifier is done with the Windows Key and the Plus key (if you want to zoom in) or the Minus key (if you want to zoom out). You can magnify any part of the desktop and you can also configure the Magnifier to follow the mouse pointer or the keyboard focus.
13. Minimize Everything Except The Current Window
A nice little trick that can be helpful is minimizing all the windows, except the one you are currently using. This is done with the combination Windows key + Home key.
14. TroubleShooting the Power Management
A new feature of Windows 7 is the ability to inform you in detail, how much power you are using. It can tell you this information for each device or application you’re using. To access this information, you need to press the Windows key. After this, you should type POWERCFG -ENERGY -OUTPUT <path\filename>, which will make the file called energy-report.html, in the folder of your choosing. This file will be created after 60 seconds, which it uses to observe the PC and create the report based on those observations.
15. Adding Videos In Your Start Menu
If you’re using videos on a regular basis and you want to be able to open them faster, you can add them to the Start Menu by right clicking on Start, going to Properties / Start Menu / Customize and selecting the Display as a link option for Videos.
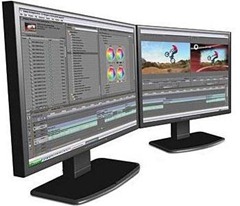 16. Moving Windows From One Monitor To Another
For those of you blessed with at least two monitors, moving windows from one to the other has never been so easy as it is in Windows 7. All you have to do is press this combination of keys: Windows + Shift + Right or Left (depending on the monitor where you want it moved).
17. Customize the Power Button
You have the option to replace the standard Shut Down button with another one. This is nice if you rarely shut down your PC, restarting it instead. Right click on Start, click on Properties and choose what you want the Power Boot Action to do.
18. Adding New Fonts
In Windows 7 all you have to do if you want to add a new font is to double click on it after you downloaded it, and you’ll see the install button.
19. Stretching Windows Vertically
You can quickly stretch your current active window vertically by using the Windows + Shift + Up combination. In order to restore them, use the Down instead of the Up key.
20. Opening Windows Explorer
A quick shortcut for Windows Explorer is Windows + E.
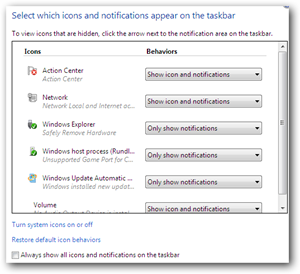 21. Turning Off System Notifications
If you want to stop system notifications from annoying you, you can do it by doing a double click on Notification Area Icons, while you’re in the Control Panel. You can then choose to change the icons and notifications for the Network, Windows Explorer, Action Center, Volume, Windows Updates and the Media Center Tray Applet.
22. Turning Off Security Messages
Visit Control Panel / System and Security / Action Center / Change Action Center Settings, if you want to change the notifications received from Internet Security Settings, Windows Update, Network Firewall, User Account Control, Spyware, Windows Backup, Virus Protection, Check for updates and Windows Troubleshooting.
23. Opening A Program As An Administrator
If you want to open a program as an admin, use the Ctrl + Shift combination while you’re opening the program.
24. Same Program Windows Switching
When you have multiple instances of a program open, holding Ctrl while you click on the icon will allow you to cycle through them.
25. Auto Arranging Desktop Icons
Instead of doing a Right click and selecting Auto arrange, you press on F5 for a little bit and you will see that they auto arrange themselves.
26. Encrypting Removable USB Drives
Encrypting an USB drive is as easy as right clicking on it and selecting “Turn on Bitlocker”.
27. Turning Off The Smart Window Arrangement
A new feature in Windows 7 is the way it arranges windows intelligently. If you want to turn it off, push the Windows key, type regedit, and go to HKEY_CURRENT_USER\Control Panel\Desktop and set the WindowArrangementActive option to 0. Next, reboot, and it will be off.
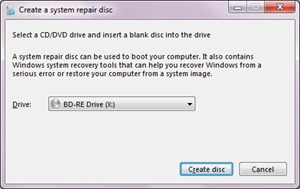 28. Making A System Repair Disc
Pressing Windows and typing “system repair disc” will allow you to make a bootable System Repair Disc, with a few system tools included.
29. Hard-Link Migration Store
If you have a new computer, this tool will let you migrate user accounts, settings and files from your old PC.
30. Open A Folder In A New Process
The way Windows 7 works, it will open in a single process all the folders, so resources are saved. However, if one folder crashes, they all do. To bypass this issue, right click on the drive while holding down Shift and select Open in New Process.
31. Problem Step Recorder To Create Tutorials
The Problem Step Recorder can be used to make a tutorial with step by step instructions. You can start it by pressing Windows and typing PSR.exe. Next, click Record and it will save every move you make in a HTML file.
32. Using Mouse Gestures
Gestures are now available for mouse users in Windows 7. If you want to access the jump list, instead of right clicking an icon from the Taskbar, hold the left click button and drag it upwards. An Internet Explorer gesture is click on the address bar and dragging it down, which will open its browsing history. Do you know any other gestures in Windows 7?
33. Turning Off The Recent Search Queries Display
Something that I dislike in Windows 7 is that it shows the recent search queries. To disable this, type gpedit.msc after you press Windows. Next you go to User Configuration / Administrative Templates / Windows Components / Windows Explorer and you do a double click on the option called “Turn off display of recent search entries”.
34. Remove The Sidebar
Even though the sidebar isn’t part of Windows 7 anymore, it still loads when the computer starts, so you consume RAM with it, even though you don’t use it. To take back that little bit of RAM, press Windows, type MSCONFIG.exe, clickon the Startup tab and finally, clear the Sidebar box.
35. Locking the screen
Since Windows 7 doesn’t come with a Lock Screen button where it was previously placed (in the Start Menu), you can access it by using the Windows + L shortcut key.
36. Enabling The Run Command In The Start Menu
If you used Windows XP before and you want the old Run Command button back, you can get it back in Windows 7. Simply right click in Start Menu on an empty area, select Properties / Start Menu / Customize, and then check Run Command. That’s it.
Be The First To Comment