Category Archives: Windows 7

Free Windows 7 Games

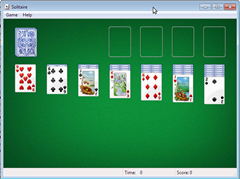
Windows 7 has some stock of interesting games built in the system. The major part was already present in the Windows Vista: Mahjong Titans, Purple Place, Hearts or Chess Titans. The classic Solitaire, FreeCell and Minesweeper are kept from the older versions of Windows. The exception is the Inkball game, which existed on the Windows Vista and was not taken over by the Windows 7, for some unknown reasons.

The Internet Games of Windows 7

There are also Internet games available on the Windows 7. You will find Backgammon, Internet Spades and Internet Checkers. They all got improved compared to the older versions, which can be notice in the way they look and the way it feels playing them. They offer the possibility to compete with other players online. You get to play with people with the same skills as you, no matter where in the world. Once a player gets off the game, the computer automatically continues the games just from the point where the player left it off. You have the choice of the design for background and cards and keep an evidence of your results.

Windows-7-Games All these games were designed to help enjoying the spare time. If you look for more diversity, then try the MSN Games website from Microsoft. There you can play free if you click on the panel on the right in the Games folder.

The games provided by Windows 7 aren’t the only options you have in terms of computer games. You can buy many other games which are compatible with your operating system. In order to choose the games best suited to your computer performances, just check them by clicking on the second tab in the panel on the right, in the Games folder. There you will see the computer’s performance rating and you will know what games can run on your PC.

Windows 7 Compatibility Issues

When compared to the Windows Vista, the new Windows 7 is just bliss. It got a lot of good reviews.

Compared to the Vista, Windows 7 is much more compatible, which, of course, makes it preferred to the previous operating system. The differences between Windows 7 and the Vista aren’t as noticeable as they were between Vista and XP. This is why adaptability to the new version was easier. Most of the programs are compatible to Windows 7, but there are still some issues to be solved and can’t be avoided.

Windows 7 Driver Compatibility

The most encountered issue related to windows 7 is the driver compatibility because the low-level code they have in the system. Whenever changing the operating system, the drivers which are already installed will look to work with those operating system parts which they were set for, but no longer exist. And they will fail to function. Starting from this malfunctioning, more parts of the computer will malfunction and new drivers require to be installed.

Windows 7 Compatibility Issues Drivers which previously worked on the Windows Vista operating system will function very well with the new Windows 7. Problems occur when passing from XP to the Windows 7 and it is going to be needed a whole new set of drivers to match the new operating system, from the programs running on your computer to the devices connected to your PC.

However, this is not a problem since every vendor provides drivers compatible to any operating system and they all can be found on the vendors’ websites. For instance, if you are using a video card from Nvidia, you will download the video drivers from the Nvidia website. The same happens if you have a HP printer; go to the HP website and download the driver compatible with the Windows 7. From this point on, drivers compatibility with the Windows 7 won’t be a problem any more.

36 Tips & Tricks For Windows 7

If you ask any Windows 7 user, he will probably tell you that this new OS is miles ahead of Windows Vista. Still it’s not a perfect OS, and there are plenty of tweaks, tips and tricks that can help make your life easier. Below are 36 different tips on how to make the most out of your Windows 7 installation.

Continue reading

Only 3 Windows 7 Editions

windows-7-graphic Microsoft decided to cut down a bit on the number of Windows 7 editions that they will be releasing. With Vista that was a bit of an issue, as buyers had no clue which one to choose from the many options that were available.

Only three different variants of Windows 7 will be launched though and you can see the details about them below:

Windows 7 Home Premium has the same features as Vista Home Premium had, coming with Windows Media Center, Aero interface, handwriting, multi touch and DVD playback.

Windows 7 Professional has the features that a Vista business installation would have. Besides the features of the Home Premium version, the Professional will also have group policy based management tools, joining Windows domains, network based backup features, Remote Desktop host capabilities and Encrypting file system support.

Windows 7 Ultimate is the best version out of the three. Besides the features that Professional has, it will also come with:

In either case, the feature set includes everything in Professional edition plus support for BitLocker whole-drive encryption (and the new BitLocker To Go feature, which adds high-grade encryption to removable media). This edition also includes all supported language packs (those cost extra for other editions) and the capability to boot from a VHD.

The Best Windows 7 Keyboard Shortcuts

Windows 7 comes with a number of new keyboard shortcuts, but there are a few of them that I especially like.

  • Win+Home: Clear all but the active window
  • Win+Space: All windows become transparent so you can see through to the desktop
  • Win+Up arrow: Maximize the active window
  • Win+Down arrow: Minimize the window/Restore the window if it’s maximized
  • Win+Left/Right arrows: Dock the window to each side of the monitor (If you’ve got dual monitors, adding Shift to the mix (e.g., Win+Shift+Right arrow) will move the window to the adjacent monitor.)
  • Win+T: Focus and scroll through items on the taskbar.
  • Win+P: Adjust presentation settings for your display
  • Win+(+/-): Zoom in/out
  • Shift+Click a taskbar item: Open a new instance of that application

If you want to use at least some of these Windows 7 shortcuts on Windows XP or Vista, read this article from Lifehacker.

How To Mount ISO Files On Windows 7

Not every piece of software that works on Windows XP or Vista will work on Windows 7. Mounting ISO files can be particularly difficult if you’ve been using Daemon Tools to do it so far.

Until Daemon Tools shows up with a version that will work on Windows 7, you can use PowerISO to mount ISO, nrg, mdf and a few other types of image files. PowerISO is freeware so there shouldn’t be any problem. Its only limitations is the screen that asks you to register it and a limit of 300Mb when creating or editing files. Mounting files doesn’t come with limitations however.

Update: there is now a Daemon Tools version that works on Windows 7.
poweriso

Mount ISO Windows 7 with Virtual CloneDrive

Now, while Daemon Tools or PowerISO is a decent choice if you want to mount ISO files on Windows 7, they’re not the only options. Instead of going with the old favorites, you might want to try something new. If that’s the case, I’ll suggest using Virtual CloneDrive.

Mount ISO on Windows 7 with Virtual CloneDrive

In order to use this software, download it from their site first. Once you get past the installation process, you will be able to use the mount ISO option without any other delays. There is no restart required on Windows 7 for this utility to work, like there is for other ISO mounting programs.

All you will have to do is double click on a ISO file and it will be mounted and ready to use. An alternative would be to right-click on the file, go to the “Open with” menu and select the option to mount the file.

Mount ISO Windows 8 Is Now a Native Option

If you want to mount ISO on Windows 8, it’s a much easier task to do in this version of the Microsoft operating system, than it was in the past. You had to install a software to do that previously, but with this version the ISO mounting is done by Windows itself. It can do that from the get go, without any special setup. All you have to do is select the mount ISO on Windows 8 option and you will have access to the files on the image immediately. Here’s how you can do that.

First of all, go to the directory where you have your ISO file. Once you’re there, right click on the file you want to mount, and then select Mount. That’s about it. The ISO is mounted on Windows 8 so you have access to its files.

Another way to do it, is by double clicking on the ISO file, which should give you the option to either Mount, which would make it in a virtual drive, or Burn, which would write it on a DVD or CD.

You’re free to mount as many ISO images as you’d like, so you’re not limited to just one or two. It only took Microsoft about a decade, but they’ve finally decided to mount ISO’s on Windows 8 natively.